|
Workflow Management: Task Creation & Management
This page is a continuation of the Criteria Creation & Management page, but the information here can also be used independently/for existing Workflow.
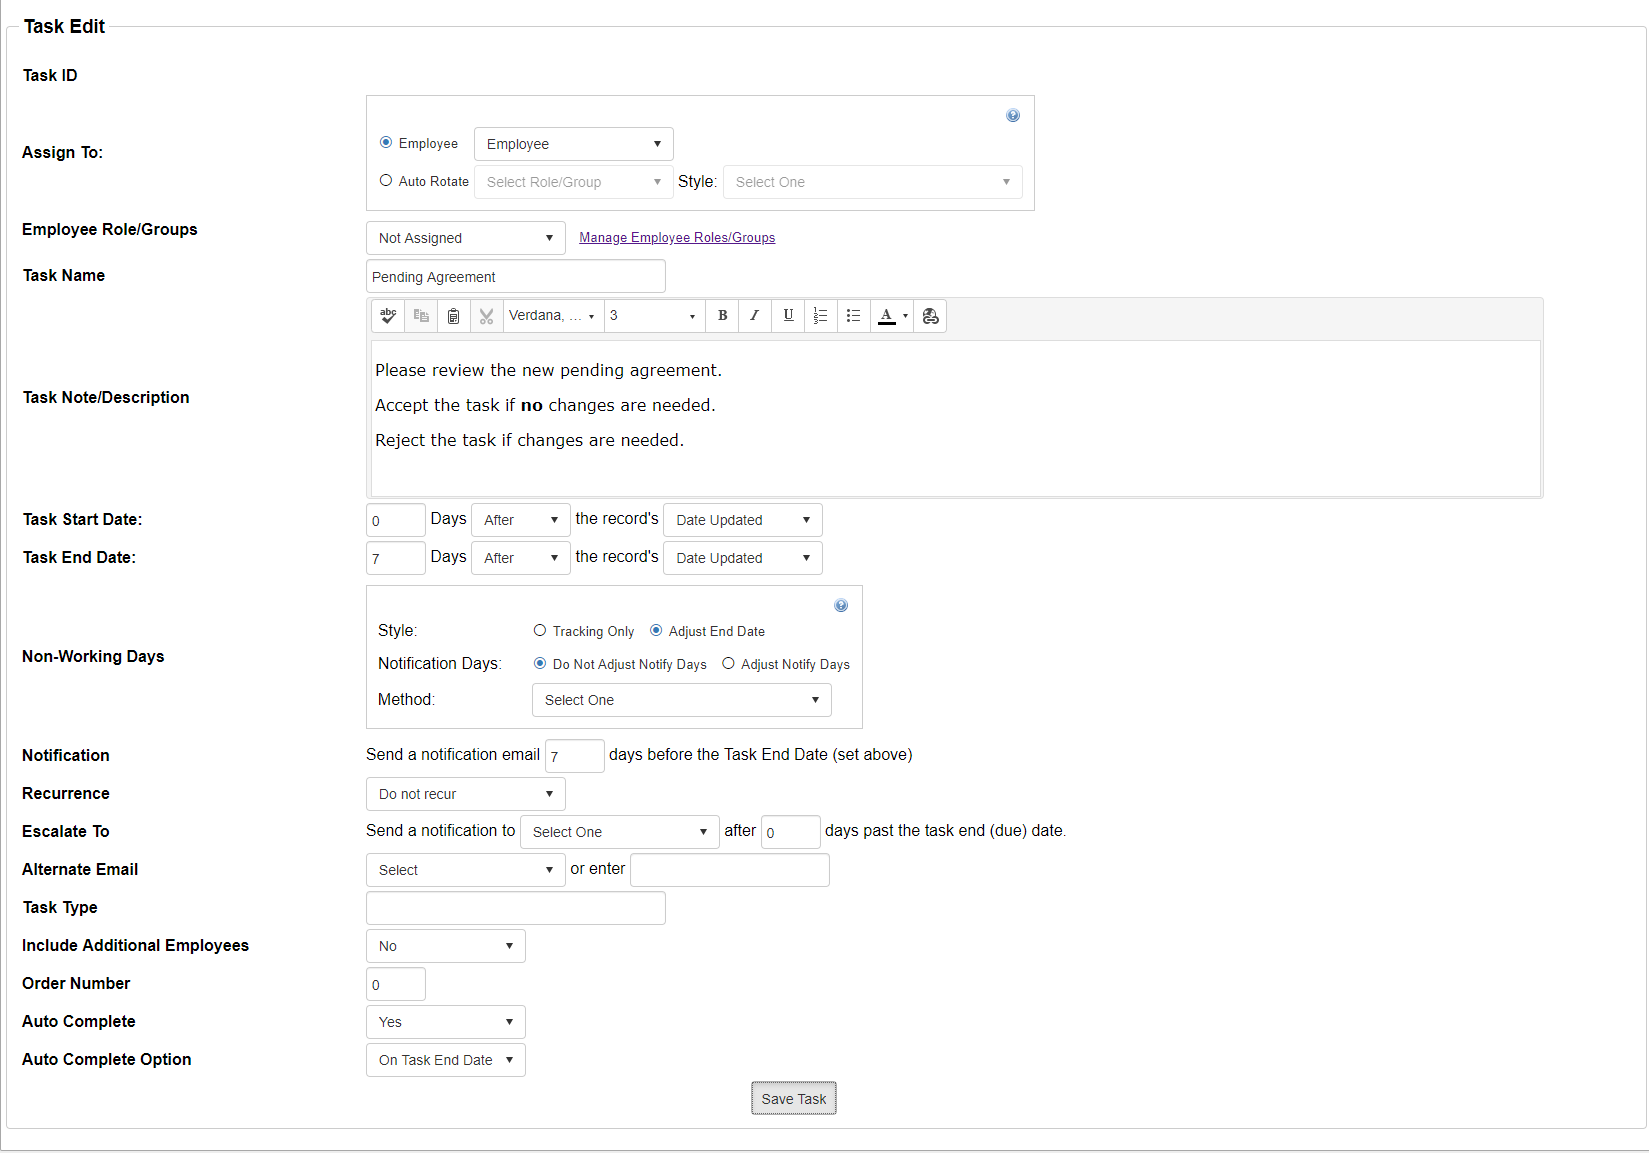
Click the Task tab to navigate to the Task List. What is essentially an Add Screen for a new Task displays. Using this, detail the Task that will be triggered when the Workflow Criteria are met.

Employee: The Employee the Workflow Task will be assigned to. Due to the variable nature of Workflows, tasks can be assigned to a variety of Employees, including:
- Employee: The Employee Assigned to the record which triggers the Workflow
- Employee’s Manager: The Manager of the Employee Assigned to the record which triggers the Workflow
- Entered By: The Employee who entered the record which triggers the Workflow
- Updated By: The Employee who last updated the record which triggers the Workflow
Auto Rotate: Alternately, a Task can be assigned to a specific Role/Group and then assigned to a Role/Group member by Sort Order, Sort Order - Fill Count, or Sort Order - Even Distribution.
Role/Group: Optionally, assign an Employee Role/Group to the Task as well. Members of the Role/Group will be treated as if they were the Employee Assigned to the Workflow Task, meaning they will receive the Task Alerts and, dependent on their Permissions, be able to Accept/Reject the Task.
Task Title/Name: The Title or Name of the Task that will be generated.
Task Note/Description: Details of/instructions for the Task, including what, if anything, is expected of the recipient.
Task Start Date and End Date: Due to the variable nature of Workflow (it can be triggered any time the Criteria are met), the Start Date and End Date are based on variables as well. A good rule of thumb is to start with the right-most drop down, selecting which Date Field you’ll base the Task Date on, and then designate that date to be X number of days Before or After the value of that Date Field. In our example, we’ll see that the Start Date is set to 0 days before record’s Date Updated, and the End Date is set to 7 days after record’s Date Updated. Therefore, the Task Start Date will be set to the day the record triggers the Workflow, and the Task End Date will be 7 days later.
Non-Working Days: Non-Working Days can be applied to ensure that Task Dates do not fall on Non-Working Days. Tracking Only means this feature is not being used, while setting it to Adjust End Date will turn on the functionality and allow an administrator to change the remaining settings. Do Not Adjust Notify Days will let the Notify Days fall on any day, while Adjust Notify Days will adjust in accordance with the next setting. The Method drop down is where you determine how you will adjust the Task Alert dates, if they would fall on a Non-Working Day.
- Extend to next working day: If the alert falls on a Non-Working day, it will be extended to the next working day. For example, if the alert would fall on a Saturday, it would likely be extended to the next Monday.
- Curtail to previous working day: If the alert falls on a Non-Working day, it will be curtailed to the previous working day. For example, if the alert would fall on a Saturday, it would likely be curtailed to the previous Friday.
- Extend for each non working day: This method effectively says you want the task to be worked on for X number of business days. If the Task End Date falls 30 days from the Task Start Date, the Task will actually be due 30 business days later, as the End Date will get pushed out one day for each Non-Working Day the range encounters.
Notify Before: Designate how many days before the Task End Date you want to be notified. If this mathematically ends up being before the Task Start Date, the Notify Alert will not go out. In our example, Notify Before is set to 7. With the Task End Date being set to 7 days after the Task Start Date, the Notify Alert will effectively be sent on the Task Start Date.
Repeat/Recur: Designate whether or not you want the Task to Repeat/Recur until the Contract’s End Date.
Escalate To: Optionally Escalate the Task to an individual X number of days after the Task End Date, if the Task has not been Completed. For example, if the Task Escalates after 7 days, it will start that countdown on the Task End Date, Escalating 7 days later if the Task has still not been Completed.
Alternate Email: Optionally designate an additional email address to send all Task Alerts to. This can be treated like the CC: function on emails.
Task Type: An optional field purely for additional reference. Enter a value here if it will be useful for Searching and Reporting.
Include Alternate/Assigned Employees: Optionally include Employees that are Additionally Assigned to the record which triggers this Workflow. They will be treated as if they are directly assigned to the Workflow Task. Please note that this will not work alongside a Workflow that is does not have Run Job on Update turned on, as the Contract Record cannot have Additional Employees Assigned until after it is entered.
Order Number: Optional functionality if you will have multiple Tasks on a single Workflow Record and want them to flow in a specific order. We generally recommend avoiding this and instead using Field Updates and sequential Workflow that has the new Field Value(s) as part of its Criteria.
Auto Complete: This functionality will automatically Complete the Workflow Task. This is useful if the Workflow Task is only for notification purposes.
Auto Complete Option: If a Task is set to Auto Complete, it can then be configured to either Auto Complete After Notification (as soon as it's first alert goes out) or On Task End Date.
Once the Workflow Task Details are appropriately filled out, click Add. The Workflow Task below has been configured to notify the Employee Assigned to the record as soon as the Contract’s Status is set to Pending, with the task due 7 days later. They are instructed to Accept the Task if no changes are needed or to Reject it if changes are needed.
After clicking Save Task, the Task will be available in the Tasks List section toward the top of the screen. Clicking Delete on the side deletes the Task while clicking Edit allows admin users to edit it. Editing a Task will reveal the Field Updates section, which we will discuss on the next Wiki page.

|